OpenStack Kolla 源码分析 --Ansible
Kolla介绍
Kolla项目利用Docker、Docker-Compose、Ansible来完成部署OpenStack,目前Kolla已经能够完成一个all-in-one的开发环境的部署。从Kolla项目spec中的描述来看,主要是利用Docker容器的隔离性来达到OpenStack的原子升级、回退在升级。整个升级、回退的过程更容易控制影响范围,降低整个OpenStack的运维复杂度。Kolla 提供了生产级别的 OpenStack Service Containers。基于社区的最佳实践,提供了更好,更快,更可靠的 , 操作 OpenStack 的部署工具。
解决的问题:
平滑的升级 / 回滚 OpenStack
隔离 OpenStack 的不同组件的依赖环境。尤其是那些使用同一模块不同版本的情况。
保证环境的一致性。解决由于安装时间不同,造成的包版本不一致的情况。
支持多种安装源:源代码安装,CentOS binary 安装等。可以替代掉 devstack。
其实这些问题只要是由 Docker 来解决的。这也是 Kolla 使用 Docker 的原因。
Kolla定义了容器集合及容器两个概念
容器集合具有以下属性:
容器集由一个或多个容器子集或者一个或多个容器组成;
一个容器集提供一个逻辑上的的服务;
启动、停止和版本的控制以容器集为粒度;
以容器集的粒度来完成安装;
包含容器子集的容器集也以一个独立单元启动,包含所有的容器子集及容器子集内的所有容器;
容器集合并不是原子的管理单位;
容器集必须提供进行服务状态监控的钩子;
容器具有以下属性
容器集能够原子的升级和回退;
容器包含一个单调增长的计数器,用来标志容器的存活时间;
容器的职责是单一的;
只赋予容器刚刚好的权限;
需要包含检查容器健康状态的脚本;
必须包含pid为1的进程用来回收推出的子进程;
Kolla的容器集集包含的容器有以下OpenStack组件:
Database control:
galera
mariadb
mongodb
Messaging control:
rabbitmq
High availability control:
HAProxy keepalived
OpenStack interface:
keystone
glance-api
nova-api
ceilometer-api
heat-api
OpenStack control:
glance-controller
glance-registry
nova-controller
nova-conductor
nova-scheduler
metadata-service
cinder-controller
neutron-controller
neutron-server
ceilometer-controller
ceilometer-alarm
ceilometer-base
ceilometer-central
ceilometer-collector
ceilometer-notification
heat-controller
heat-engine
OpenStack compute operation:
nova-compute
nova-libvirt
neutron-agents-linux-bridge
neutron-agents-ovs
OpenStack network operation:
dhcp-agent
l3-agent
metadata-agent
lbaas-agent
fwaas-agent
OpenStack storage operation:
Cinder
Swift
swift-account
swift-base
swift-container
swift-object
swift-proxy-server
现在 Kolla 主要分成两个部分。
1.Docker Images Build
2.Ansible 部署 ( 这部分将来会迁移到 kolla-ansible 项目 )
Docker Image Build
主要使用 Jinja2 模板生成 Dockerfile 文件。如果是源代码安装,还会把代码下载好。之后会通过Docker-py驱动Docker进行镜像构建。构建完成,还可以根据配置将镜像推送的指定的 Registry 服务器。
现在支持的不同的 Linux 发行版本 (Redhat 系和 Debian 系 ) 和不同的 OpenStack 安装包 ( 源代码和二进制包 )
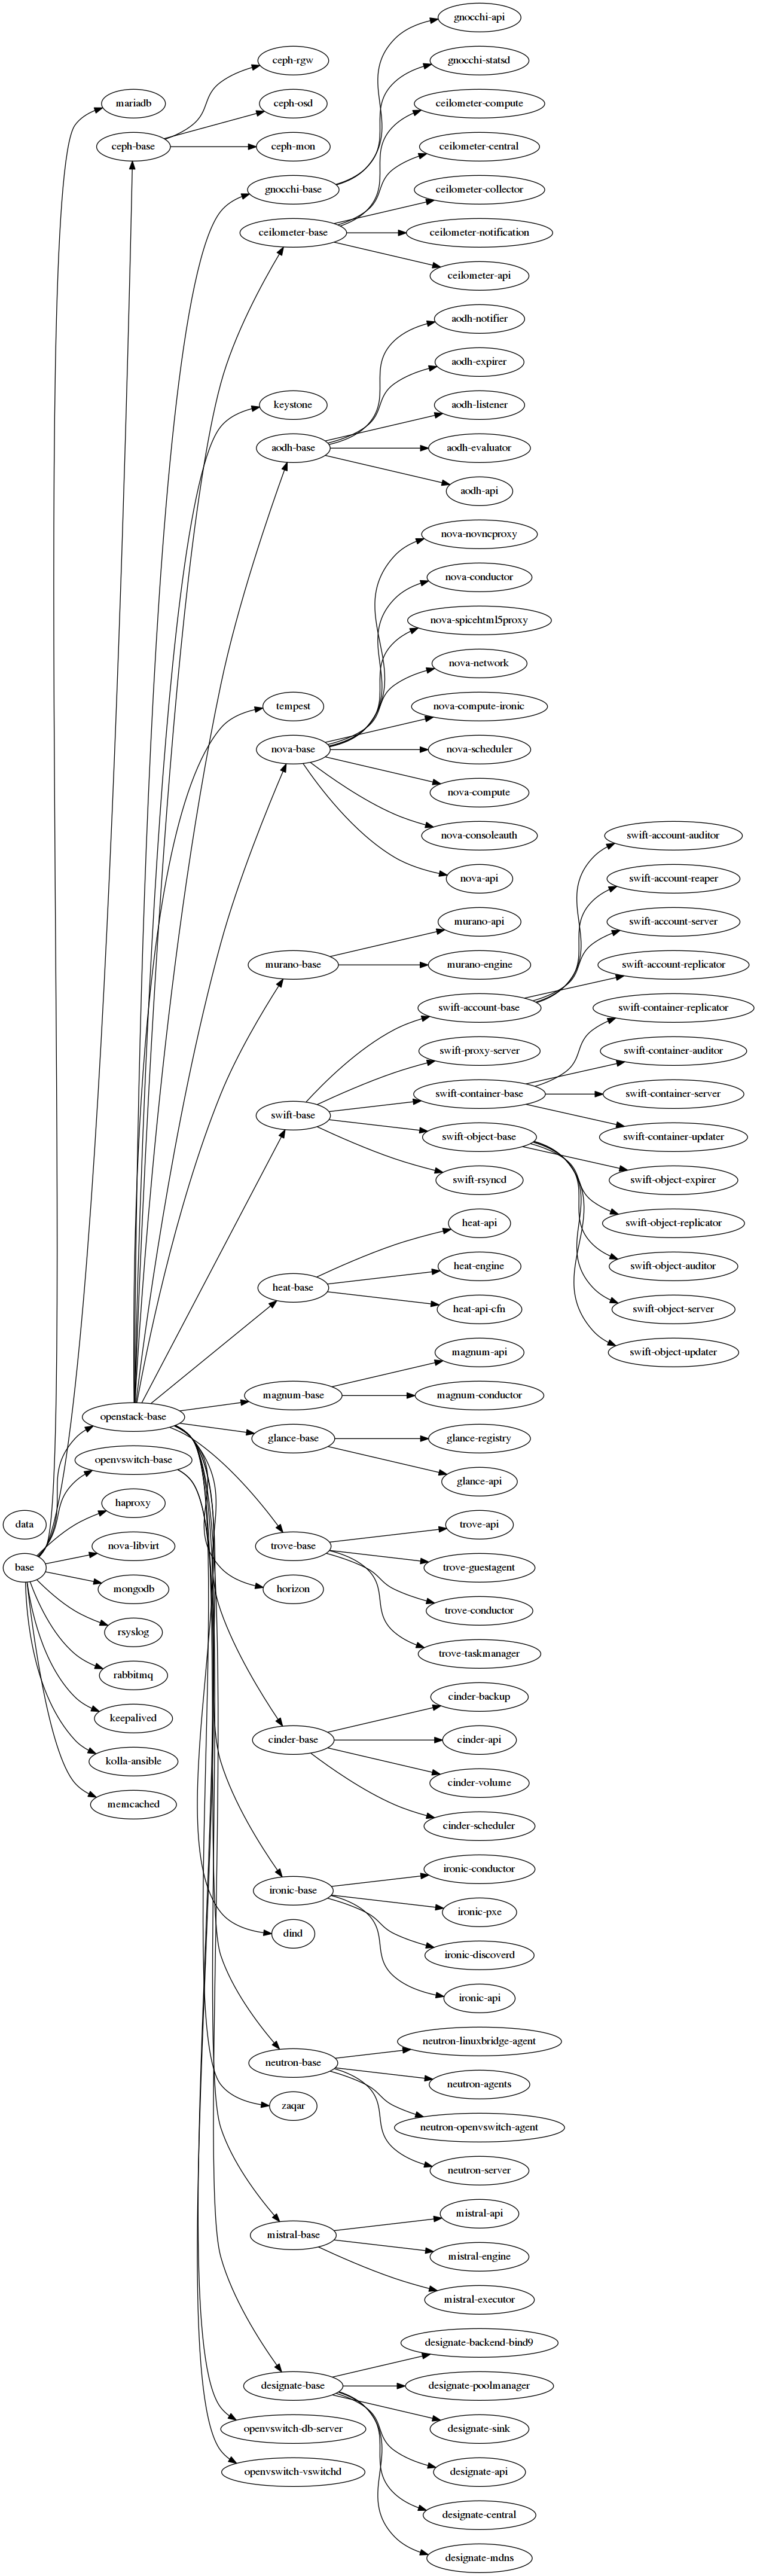
下图是现在所有镜像的依赖关系。
Ansible 部署
提供一个完整的Ansible Playbook,来部署Docker的镜像。并提供all-in-one和multihost的环境
使用到的技术Docker/LXC、Ansible、Python(docker-py、Jinja2)
ansible – Contains Ansible playbooks to deploy Kolla in Docker containers.
demos – Contains a few demos to use with Kolla.
dev/heat – Contains an OpenStack-Heat based development environment.
dev/vagrant – Contains a vagrant VirtualBox/Libvirt based development environment.
doc – Contains documentation.
etc – Contains a reference etc directory structure which requires configuration of a small number of configuration variables to achieve a working All-in-One (AIO) deployment.
docker – Contains jinja2 templates for the docker build system.
tools – Contains tools for interacting with Kolla.
specs – Contains the Kolla communities key arguments about architectural shifts in the code base.
tests – Contains functional testing tools.
setup.cfg入口文件
[files]
packages =      //包名
kolla
data_files =     //pbr指定的数据文件
share/kolla/ansible = ansible/*
share/kolla/devenv = devenv/*
share/kolla/docker = docker/*
share/kolla/doc = doc/*
share/kolla/etc_examples = etc/*
share/kolla/vagrant = vagrant/*
share/kolla = tools/init-runonce
share/kolla = tools/openrc-example
share/kolla = setup.cfg

scripts =
tools/kolla-ansible  //该脚本通过ansible与koll进行交互。使用命令为:ansible-playbook -i $INVENTORY $EXTRA_OPTS

$PLAYBOOK
[entry_points]
console_scripts =
kolla-build = kolla.cmd.build:main   //kolla程序的main主函数
oslo.config.opts =                  //oslo.config通用库用于解析命令行和配置文件中的配置选项
kolla = kolla.opts:list_opts    //字符串列表类型

[global]
setup-hooks =
pbr.hooks.setup_hook
ansible包
ansible简介
ansible是个什么东西呢?官方的title是“Ansible is Simple IT Automation”——简单的自动化IT工具。这个工具的目标有这么几项:
自动化部署APP;自动化管理配置项;自动化的持续交互;自动化的(AWS)云服务管理。
所有的这几个目标从本质上来说都是在一个台或者几台服务器上,执行一系列的命令而已。通俗的说就是批量的在远程服务器上执行命令 。当然,最主要的是它是基于paramiko开发的。这个paramiko是什么呢?它是一个纯Python实现的ssh协议库。因此fabric和ansible还有一个共同点就是不需要在远程主机上安装client/agents,因为它们是基于ssh来和远程主机通讯的。简单归纳一下:
Ansible
—基于 Python paramiko 开发,分布式,无需客户端,轻量级,配置语法使用YMAL及Jinja2模板语言,更强的远程命令执行
Ansible工作机制
Ansible 在管理节点将 Ansible 模块通过 SSH 协议(或者 Kerberos、LDAP)推送到被管理端执行,执行完之后自动删除,可以使用 SVN 等来管理自定义模块及编排
Ansible优点:
ansible在特性上似乎并不抢眼,配置管理方面(playbook)绝对比不过老大哥puppet,批量执行方面也只是多线程,不像saltstack那么高大上,不过ansible搜索热度高出saltstack三倍多,显然靠的不是吹牛,至少,ansible至少不会悄悄的丢机器,而且仅依赖ssh,与登录授权管理系统天然集成,简单即有效,没有比这更美妙的事情了。
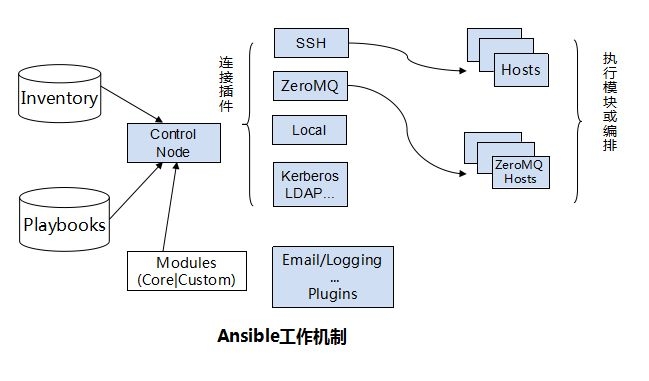
由上面的图可以看到Ansible的组成由 5 个部分组成:
Ansible:核心
Modules:包括Ansible自带的核心模块及自定义模块
Plugins:完成模块功能的补充,包括连接插件、邮件插件等
Playbooks:网上很多翻译为剧本,个人觉得理解为编排更为合理;定义 Ansible 多任务配置文件,有Ansible自动执行
Inventory:定义Ansible管理主机的清单
Ansible代码包很庞大:这是因为OpenStack的服务的配置文件都在这个自动化安装的库里面。
代码结构如下:
#ansible的code tree如下
├── ansible
│   ├── action_plugins
│   │   └── merge_configs.py
│   ├── certificates.yml
│   ├── group_vars
│   │   └── all.yml
│   ├── inventory
│   │   ├── all-in-one
│   │   └── multinode
│   ├── library
│   │   ├── bslurp.py
│   │   ├── kolla_docker.py
│   │   └── merge_configs.py
│   ├── mariadb_recovery.yml
│   ├── post-deploy.yml
│   ├── prechecks.yml
│   ├── roles
│   │   ├── ceph
│   │   ├── ceph_pools.yml
│   │   ├── certificates
│   │   ├── cinder
│   │   ├── elasticsearch
│   │   ├── glance
│   │   ├── haproxy
│   │   ├── heat
│   │   ├── horizon
│   │   ├── ironic
│   │   ├── iscsi
│   │   ├── keystone
│   │   ├── kibana
│   │   ├── magnum
│   │   ├── manila
│   │   ├── mariadb
│   │   ├── memcached
│   │   ├── neutron
│   │   ├── nova
│   │   ├── prechecks
│   │   ├── rabbitmq
│   │   └── swift
│   │
│   └── site.yml
action_plugin中在merge_configs.py作用是导入template模板,并且run
  def read_config(self, source, inject, config):
        # 检查配置文件是否存在,并且读取配置信息
        if os.access(source, os.R_OK):
            # 读取目录中模板的数据 & 存在resultant中
            resultant = template.template_from_file(self.runner.basedir,
                                                    source, inject)

            # 把resultant中的数据转成String之后存在fakefile中,并关闭文件
            fakefile = StringIO(resultant)
            config.readfp(fakefile)
            fakefile.close()

  def run(self, conn, tmp, module_name, module_args, inject,
            complex_args=None, **kwargs):
            #在run函数中导入模块信息,读取source信息,存放在fakefile中最后生成confg文件
            for source in sources:
            #读source
            source = template.template(self.runner.basedir, source, inject)

            try:
                self.read_config(source, inject, config)
            except Exception as e:
                return ReturnData(conn=conn, comm_ok=False,
                                  result={'failed': True, 'msg': str(e)})

           fakefile = StringIO()
            #从一个fake模拟文件中生成配置文件
           config.write(fakefile)
介绍一下YML文件的概念:
YML文件格式是YAML(YAML Aint Markup Language)编写的文件格式,YAML是一种直观的能够被电脑识别的的数据数据序列化格式,容易和脚本语言交互的,可以被支持YAML库的不同的编程语言程序导入,比如: C/C++, Ruby, Python, Java, Perl, C#, PHP等。
在all.yml作用是提供文件目录、以及各种配置信息(如IP地址、端口号、进程id等等)
#摘取了一部分
#文件目录
node_templates_directory: "/usr/share/kolla/templates"
#kolla的内部ip地址
kolla_internal_vip_address: ""
#docker仓库信息
docker_registry_username:
#OpenStack各个服务的api接口
api_interface: ""
#OpenStack服务端口号
rabbitmq_port: "5672"
#OpenStack服务是否开启
enable_keystone: "yes"
在inventory文件夹中有all-in-one和multinode两个配置文件,这两个文件中的信息可以更改,从而部署符合需求的OpenStack环境,有点类似于DevStack中的local.conf
截取其中一部分:
# 在multinode下需要根据实际生产环境配置hostname
control01
control02
control03
# Glance
[glance-api:children]
glance
[glance-registry:children]
glance
# Nova
[nova-api:children]
nova
[nova-conductor:children]
nova
在library文件夹下的bslurp.py的作用是从其他node中gfetch文件然后再push到其他的node中
#从其他的node中拷贝
def copy_from_host(module):
    compress = module.params.get('compress')
    #取到src文件,存入src
    src = module.params.get('src')
    #如果不存在,则报错
    if not os.path.exists(src):
        module.fail_json(msg="file not found: {}".format(src))
    #如果没有权限,则报unreadable
    if not os.access(src, os.R_OK):
        module.fail_json(msg="file is not readable: {}".format(src))

    mode = oct(os.stat(src).st_mode & 0o777)
    #read file
    with open(src, 'rb') as f:
        raw_data = f.read()
    #进行校验
    sha1 = hashlib.sha1(raw_data).hexdigest()
    #压缩文件
    data = zlib.compress(raw_data) if compress else raw_data
    #调用exit_json退出
    module.exit_json(content=base64.b64encode(data), sha1=sha1, mode=mode,
                     source=src)
    #然后拷贝文件到目的主机
在library文件夹下的kolla_docker.py的作用则是为了kolla控制Docker
tls是为了在远端配置Docker的认证
Docker daemon在0.10后支持–tlsverify 来提供加密的远端连接
def generate_tls(self):
        #tls协议,获取tls_cert、tls_key、tls_cacert
        tls = {'verify': self.params.get('tls_verify')}
        tls_cert = self.params.get('tls_cert'),
        tls_key = self.params.get('tls_key'),
        tls_cacert = self.params.get('tls_cacert')

        if tls['verify']:
        #进行check_file
            if tlscert:
                self.check_file(tls['tls_cert'])
                self.check_file(tls['tls_key'])
                tls['client_cert'] = (tls_cert, tls_key)
            if tlscacert:
                self.check_file(tls['tls_cacert'])
                tls['verify'] = tls_cacert
        #返回配置文件
        return docker.tls.TLSConfig(**tls)
接下去有很多check方法,有check文件、镜像、容器、容器的比对,还有compare优先级、镜像,pid,运行环境等
def check_volume(self):
        #比对vol的name
        for vol in self.dc.volumes()['Volumes'] or list():
            if vol['Name'] == self.params.get('name'):
                return vol

    def check_container(self):
        #比对container的name
        find_name = '/{}'.format(self.params.get('name'))
        for cont in self.dc.containers(all=True):
            if find_name in cont['Names']:
                return cont
代码check和compare结束之后是pull_image方法、remove_container方法、create_container、start_container等对容器一系列操作的方法
#根据前面定义的options创建容器
#类似于命令中的各种创建参数
def create_container(self):
        self.changed = True
        options = self.build_container_options()
        self.dc.create_container(**options)
#根据container的name删除容器
def remove_container(self):
        if self.check_container():
            self.changed = True
            self.dc.remove_container(
                container=self.params.get('name'),
                force=True
            )
#还有start_container方法
def start_container(self):
        if not self.check_image():
            self.pull_image()
		#先检查仓库中有没有改image
		#没有的话就去pull
        container = self.check_container()
        #如果container已经存在,但是进行container的check有差别
        #那么删除这个container,再次进行check
        if container and self.check_container_differs():
            self.remove_container()
            container = self.check_container()
        #如果container不存在,创建该container
        if not container:
            self.create_container()
            container = self.check_container()
        #container存在但没有up状态,那么将其状态转换成up
        if not container['Status'].startswith('Up '):
            self.changed = True
            self.dc.start(container=self.params.get('name'))
        #如果container没有detach断开,那么进入wait状态,调用fail_json方法,传递fail的参数
        # We do not want to detach so we wait around for container to exit
        if not self.params.get('detach'):
            rc = self.dc.wait(self.params.get('name'))
            if rc != 0:
                self.module.fail_json(
                    failed=True,
                    changed=True,
                    msg="Container exited with non-zero return code"
                )
            #如果返回参数remove_on_exit,那么删除该container
            if self.params.get('remove_on_exit'):
                self.remove_container()
下面是roles文件夹,里面内容很庞大。里面是各种组件的yml的配置文件,如ceph,cinder,glance,nova,neutron等。我就neutron配置文件做一下分析。其他的应该是类似的。
在这里Ansible使用Playbook,采用YAML语法结构,这些配置文件易于阅读并加以配置。通过playbook自动化了它的执行,这些playbook是指定要执行的每个任务和它们的属性的YAML文件。
Ansible还使用了清单(inventory)来将用户提供的主机映射到基础架构中的具体端点。不同于静态hosts文件,Ansible支持动态内容。内置的列表包含一个 Docker插件,该插件可查询Docker守护进程并向Ansible playbook共享大量信息。
Neutron文件夹下有4个文件夹,分别是default、meta、tasks和templates
defaults和meta文件下的是main.yml,主要功能是提供了neutron下各个组件的配置信息,和这些组件在docker仓库的存放及调用的路径以及tag
#其中这里的组件都使用了template文件模版,进行文档内变量的替换的模块。
neutron_dhcp_agent_image
neutron_dhcp_agent_tag
neutron_dhcp_agent_image_full
neutron_l3_agent_image
neutron_l3_agent_tag
neutron_l3_agent_image_full
neutron_linuxbridge_agent_image
neutron_linuxbridge_agent_tag
neutron_linuxbridge_agent_image_full
neutron_metadata_agent_image
neutron_metadata_agent_tag
neutron_metadata_agent_image_full
neutron_openvswitch_agent_image
neutron_openvswitch_agent_tag
neutron_openvswitch_agent_image_full
neutron_server_image
neutron_server_tag
neutron_server_image_full
openvswitch_db_image
openvswitch_db_tag
openvswitch_db_image_full
openvswitch_vswitchd_image
openvswitch_vswitchd_tag
openvswitch_vswitchd_image_full:
在task目录:在task目录下面就是如何根据配置文件启动docker image
默认ansible的所有task是在我们的配置的管理机器上面运行的,当在一个独立的群集里面配置,那是适用的。而有一些情况是,某些任务运行的状态是需要传递给其他机器的,在同一个任务你需要在其他机器上执行,这时候你就要用task委托。
在bootstrap_mons.yml中提供了Neutron数据库的creating和用户的创建,并赋予权限的配置信息
几乎所有的模块都是会outputs一些东西,甚至debug模块也会。结果变量还有其他的用途,譬如需要保存结果变量,然后在我的playbook的其他地方给使用。register就提供保存结果这个功能。
- name: Creating Neutron database
  command: docker exec -t kolla_toolbox /usr/bin/ansible localhost
    -m mysql_db
    -a "login_host=''
        login_user=''
        login_password=''
        name=''"
- name: Creating Neutron database user and setting permissions
  command: docker exec -t kolla_toolbox /usr/bin/ansible localhost
    -m mysql_user
    -a "login_host=''
        login_user=''
        login_password=''
        name=''
        password=''
        host='%'
        priv='.*:ALL'
        append_privs='yes'"
#保存结果
  register: database_user_create
在bootstrap_service.yml中包含了启动一个neutron服务所需要的依赖配置,其中有使用delegate_to关键字便可以配置任务在其他机器上执行。
其他模块还是在所有配置的管理机器上运行的,当到了这个关键字的任务就是使用委托的机器上运行。而facts还是适用于当前的host。
---
- name: Running Neutron bootstrap container
  kolla_docker:
#启动一个docker
    action: "start_container"
    common_options: ""
    detach: False
#所需要的环境 config_strategy
    environment:
      KOLLA_BOOTSTRAP:
      KOLLA_CONFIG_STRATEGY: ""
#启动所需要的镜像
    image: ""
    labels:
      BOOTSTRAP:
    name: "bootstrap_neutron"
    restart_policy: "never"
#配置信息及log的目录
    volumes:
      - "/neutron-server/:/:ro"
      - "kolla_logs:/var/log/kolla/"
  run_once: True
#delegate_to关键字便可以配置任务在其他机器上执行
  delegate_to: ""
在config-neutron-fake.yml中提供了代码的鲁棒性
为了保证config的文件都是存在的,如neutron的neutron.conf和ml2_conf.ini等
在config.yml中则是将每个小的agent,server作为item进行划分,再分别把配置信息写入neutron的各个配置文件中。也就是kolla项目所说的原子级别的OpenStack环境部署
- name: Copying over neutron.conf
  merge_configs:
    vars:
      service_name: ""
    sources:
      - "/templates/neutron.conf.j2"
      - "/etc/kolla/config/global.conf"
      - "/etc/kolla/config/database.conf"
      - "/etc/kolla/config/messaging.conf"
      - "/etc/kolla/config/neutron.conf"
      - "/etc/kolla/config/neutron/.conf"
      - "/etc/kolla/config/neutron//neutron.conf"
    dest: "//neutron.conf"
  with_items:
    - "neutron-dhcp-agent"
    - "neutron-l3-agent"
    - "neutron-linuxbridge-agent"
    - "neutron-metadata-agent"
    - "neutron-openvswitch-agent"
    - "neutron-server"
在deploy.yml中将boot一个组件所需要的配置信息都include进来,包括有
ironic-check.yml
config.yml
config-neutron-fake.yml
bootstrap.yml
start.yml
在do_reconfigure.yml中则是需要保证所有deploy完成的服务全都up。如果没有up的话就执行action: “restart_container”
- name: Restart containers running neutron-server and neutron agents
  kolla_docker:
    name: ""
    action: "restart_container"
  when:
    - config_strategy == 'COPY_ALWAYS'
    - inventory_hostname in groups[item[0]['group']]
    - item[1]['KOLLA_CONFIG_STRATEGY'] != 'COPY_ONCE'
    - item[2]['rc'] == 1
  with_together:
    - [{ name: neutron_server, group: neutron-server },
       { name: neutron_dhcp_agent, group: neutron-dhcp-agent },
       { name: neutron_l3_agent, group: neutron-l3-agent },
       { name: neutron_metadata_agent, group: neutron-metadata-agent }]
    - neutron_container_envs.results
    - neutron_check_results.results
ironic-check.yml则是检查ironic服务必须启动,neutron的plugin必须使用OpenvSwitch
main.yml提供了一个action.yml的配置文件入口
pull.yml中提供了docker的pull方法的配置信息,使用了”pull_image”的方法,docker_common_options下的参数,以及pull使用的image。
这样就把各个服务都启动起来了。
- name: Pulling neutron-dhcp-agent image
  kolla_docker:
    action: "pull_image"
    common_options: ""
    image: ""
#使用模板中的neutron-dhcp-agent的配置参数
  when: inventory_hostname in groups['neutron-dhcp-agent']
reconfigure.yml中调用之前的do_reconfigure.yml中的配置参数
模块的每次使用都会被ansible标记为”changed”状态。
pull.yml则是对容器化后的OpenStack中的服务的镜像进行pull操作。通过SSH到目的主机上
register.yml则是完成组件在keystone上的注册操作
start.yml则是完成容器的开启配置
upgrade.yml则是完成容器的升级,include config.yml bootstarp_service.yml以及start.yml
在templates文件夹下是jinjia2的模板文件
Jinja2是Python下一个被广泛应用的模版引擎,他的设计思想来源于Django的模板引擎,并扩展了其语法和一系列强大的功能。其中最显著的一个是增加了沙箱执行功能和可选的自动转义功能,这对大多应用的安全性来说是非常重要的。
他基于unicode并能在python2.4之后的版本运行,包括python3。
下面是neutron-l3-agent的配置模板
{
    "command": "neutron-l3-agent --config-file /etc/neutron/neutron.conf --config-file /etc/neutron/l3_agent.ini --config-file /etc/neutron/fwaas_driver.ini --config-file /etc/neutron/plugins/ml2/ml2_conf.ini",
    "config_files": [
        {
            "source": "/neutron.conf",
            "dest": "/etc/neutron/neutron.conf",
            "owner": "neutron",
            "perm": "0600"
        },
        {
            "source": "/ml2_conf.ini",
            "dest": "/etc/neutron/plugins/ml2/ml2_conf.ini",
            "owner": "neutron",
            "perm": "0600"
        },
        {
            "source": "/fwaas_driver.ini",
            "dest": "/etc/neutron/fwaas_driver.ini",
            "owner": "neutron",
            "perm": "0600"
        },
        {
            "source": "/l3_agent.ini",
            "dest": "/etc/neutron/l3_agent.ini",
            "owner": "neutron",
            "perm": "0600"
        }
    ]
}
已经完成的BluePrints:
2015/12废弃使用Ansible自带的 Docker module。使用自己实现的docker模块 (见REF1), 并已经完成了所有ansible roles的改造。主要原因是:
官方Docker module有bug(见REF2), 在docker 1.8.3及以上的版本工作不正常 , 而且进展缓慢。而Kolla使用的Docker版本只能锁定在 1.8.2,不能进行升级。
Ansible使用的是 GPL,而OpenStack项目使用的Apache License。不能直接修改 Ansible 的代码放到 Kolla 里使用。不想受限制于官方功能开发。有些想用的功能 (比方说新加进去的common_option, 官方是不会增加的)。
使用 oslo.config 模块替代掉了原来的 argparser 代码(见REF3)。并加上了使用 oslo-config-generator 的功能自动生成配置文件。
完善 Ubuntu Binary Container 的安装 (见REF6、7)
由于 Ubuntu 并没有类似 RDO 的 relorean 源。倒是有一个 Mitaka Staging(见REF5) 源,但是好久没有更新。所以社区之前一直没有加上这部分功能。现在虽然加上了,但是也是基于 Liberty 版本的。并不是 Master 上的代码。
另一方面,Ubuntu 方面也正在积极的解决这个问题 (见REF4)。相信不久就会有升级的 playbook 基本完成(见REF8)
近期规划
拆分ansible部分到新的项目kolla-ansible。kolla项目只用来做docker images build.部署工作由kolla-ansible, kolla-mesos9等工具来实现。
链接:
Kolla Wiki Page
1.Add docker module in Kolla
https://review.openstack.org/#/c/248812/
2.Docker 1.8.3 is broken under certain conditions
https://github.com/ansible/ansible-modules-core/issues/2257
3.use oslo.config instead of raw argparse.ArgumentParser
https://review.openstack.org/#/c/260389/
4.Mail List: Adding Ubuntu Liberty to Kolla-Mitaka
http://lists.openstack.org/pipermail/openstack-dev/2015-December/083089.html
5.Staging PPA for mitaka
https://launchpad.net/~ubuntu-cloud-archive/+archive/ubuntu/mitaka-staging
6.Gerrit: Base and openstack-base ubuntu binary containers
https://review.openstack.org/#/c/261957/
7.BP:Ubuntu binary containers
https://blueprints.launchpad.net/kolla/+spec/binary-ubuntu
8.Gerrit: Playbook for keystone upgrade
https://review.openstack.org/#/c/257568/
9.kolla-mesos
https://github.com/openstack/kolla-mesos