简要:
由于odl-networking中有很多脚本,这个脚本只针对配置qos service
QoS 被定义为保证某些网络要求像带宽、 延迟、 抖动和可靠性以满足应用程序供应商和最终用户之间的服务级别协议 (SLA) 的能力。
交换机和路由器等网络设备可以标记流量以便处理具有较高的优先级,以满足的 QoS 在 SLA 下商定的条件。在其他情况下,某些网络的流量,如语音 IP (VoIP) 和视频流需要传输的最小带宽的保障。在没有网络 QoS 管理系统上,所有交通将都转交”尽力”的方式,使它无法保证向客户提供服务。 QoS 是一种先进的服务插件。 QoS组件与其余 OpenStack neutron其他功能解耦,它可通过 ml2 扩展驱动程序。
配置
To enable the service, follow the steps below:
On network nodes:
Add the QoS service to the service_plugins setting in /etc/neutron/neutron.conf. For example:
service_plugins = \
neutron.services.l3_router.l3_router_plugin.L3RouterPlugin,
neutron.services.metering.metering_plugin.MeteringPlugin,
neutron.services.qos.qos_plugin.QoSPlugin
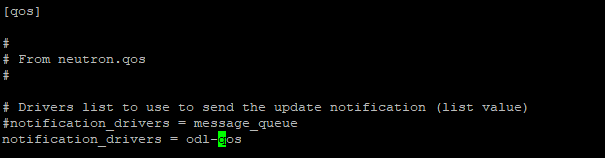
Optionally, set the needed notification_drivers in the [qos] section in /etc/neutron/neutron.conf (message_queue is the default).
[qos]
...
notification_drivers = odl-qos
In /etc/neutron/plugins/ml2/ml2_conf.ini, add qos to extension_drivers in the [ml2] section. For example:
[ml2]
extension_drivers = port_security, qos
If the Open vSwitch agent is being used, set extensions to qos in the [agent] section of /etc/neutron/plugins/ml2/openvswitch_agent.ini. For example:


[agent]
extensions = qos
On compute nodes:
In /etc/neutron/plugins/ml2/ml2_conf.ini, add qos to the extensions setting in the [agent] section. For example:
[agent]
extensions = qos
QoS currently works with ml2 only (SR-IOV, Open vSwitch, and linuxbridge are drivers that are enabled for QoS in Mitaka release).
Trusted tenants policy.json configuration
If tenants are trusted to administrate their own QoS policies in your cloud, neutron’s file policy.json can be modified to allow this.
Modify /etc/neutron/policy.json policy entries as follows:
1
2
3
4
5
6
7
8
9
10
11
12
13
14
15
16
17
18
| "get_policy": "rule:regular_user",
"create_policy": "rule:regular_user",
"update_policy": "rule:regular_user",
"delete_policy": "rule:regular_user",
To enable bandwidth limit rule:
"get_policy_bandwidth_limit_rule": "rule:regular_user",
"create_policy_bandwidth_limit_rule": "rule:admin_only",
"delete_policy_bandwidth_limit_rule": "rule:admin_only",
"update_policy_bandwidth_limit_rule": "rule:admin_only",
"get_rule_type": "rule:regular_user",
To enable DSCP marking rule:
"get_policy_dscp_marking_rule": "rule:regular_user",
"create_dscp_marking_rule": "rule:admin_only",
"delete_dscp_marking_rule": "rule:admin_only",
"update_dscp_marking_rule": "rule:admin_only",
"get_rule_type": "rule:regular_user",
|
用户操作
QoS policies are only created by admins with the default policy.json. Therefore, you should have the cloud operator set them up on behalf of the cloud tenants.
If tenants are trusted to create their own policies, check the trusted tenants policy.json configuration section.
First, create a QoS policy and its bandwidth limit rule:
$ neutron qos-policy-create bw-limiter

Created a new policy:
+-------------+--------------------------------------+
| Field       | Value                                |
+-------------+--------------------------------------+
| description |                                      |
| id          | 0ee1c673-5671-40ca-b55f-4cd4bbd999c7 |
| name        | bw-limiter                           |
| rules       |                                      |
| shared      | False                                |
| tenant_id   | 85b859134de2428d94f6ee910dc545d8     |
+-------------+--------------------------------------+

$ neutron qos-bandwidth-limit-rule-create bw-limiter --max-kbps 3000 \
  --max-burst-kbps 300

Created a new bandwidth_limit_rule:
+----------------+--------------------------------------+
| Field          | Value                                |
+----------------+--------------------------------------+
| id             | 92ceb52f-170f-49d0-9528-976e2fee2d6f |
| max_burst_kbps | 300                                  |
| max_kbps       | 3000                                 |
+----------------+--------------------------------------+
验证
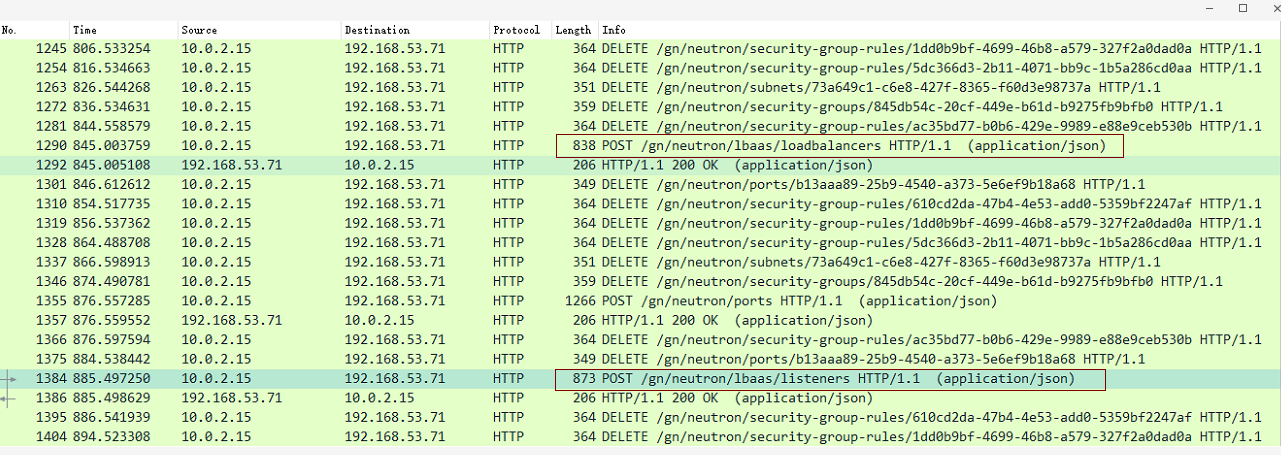
抓到了qos操作的rest请求

参考文献:
https://docs.openstack.org/mitaka/networking-guide/config-qos.html
https://docs.openstack.org/networking-odl/ocata/installation.html